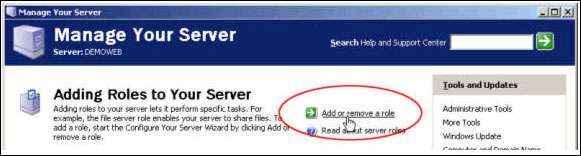
When you start your server, you should see the Manage Your Server wizard. If you don’t display this by default, you can go to Administrative Tools and click on Manage Your Server. When the wizard opens, click on Add or Remove a Role.
Click Next and let the server detect your settings, then choose Custom Configuration and click Next. Choose the Application Server Role from the list and click Next.
Since many applications require ASP.NET today, we’re going to choose to Enable ASP.NET. In addition, we will not choose to enable FrontPage Extensions at this time though.
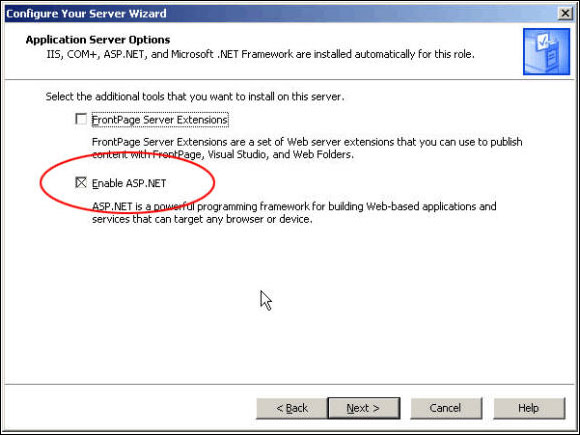
Note: In order to publish .NET applications from VisualStudio, you may want to enable FrontPage Extensions to start with.
Moving ahead, once we’ve selected what we want, we click Next to set up the role. Just let the wizard run until you see the finish button, then click Finish.
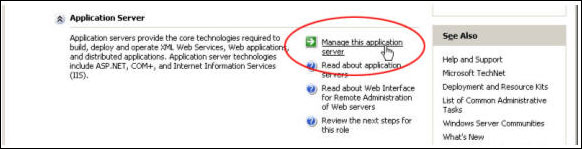
Once you’ve installed the Application Server role to your server, you’ll naturally want to check and see if it works. The Manage Your Server wizard should now show the Application Server role installed, so click on Manage This Application Server.
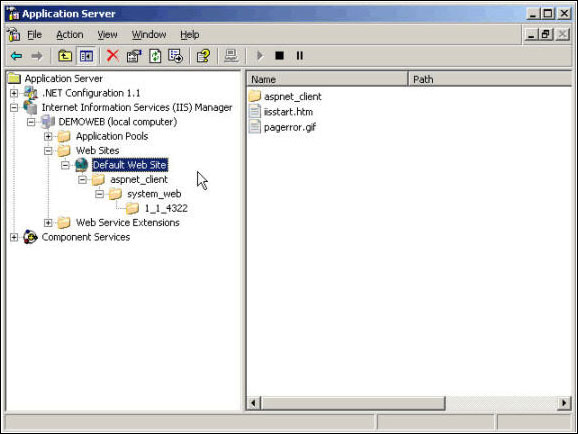
This brings up the Application Server Management Console (MMC). Expand the Internet Information Services (IIS) Manager, then expand your server (local computer), and then the Web Sites folder. You should see the Default Web Site listed as shown below, and it shouldn’t say “Stopped”. If it does, you need to troubleshoot using the Event Viewer.
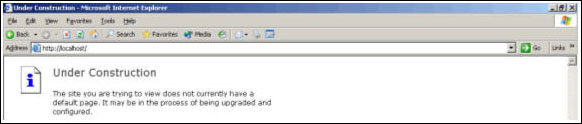
For now, ignore the files and folders listed in your default web site, we just want to run a test and ensure that IIS is running and serving a web page. On the server itself, launch Internet Explorer (IE) and browse to http://localhost/. You should see the “Under Construction” web page if the server is running correctly.
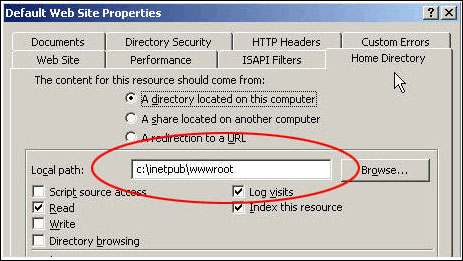
Okay, at this point you have a working IIS installation. Go back to the Application Server Management Console and right-click on the Default Web Site. Choose Properties to bring up the web site properties dialog. Then click on the Home Directory tab and ensure that the Default Site is set to the path shown below.
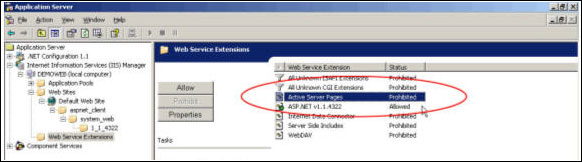
Because of the security enhancements in Windows Server 2003 and IIS 6, ASP pages are not enabled by default. Yes, we did install the server for ASP.NET, but ASP and ASP.NET isn’t the same thing.
In IIS 6, technologies like ASP, ASP.NET and so on are called Web Service Extensions. The same is true of Server Side Includes, PERL/CGI scripting, PHP and a host of other add-ons to web servers. Since many web sites run ASP (Active Server Pages), let’s activate ASP.
In the Application Server Management Console, click on the Web Service Extensions folder underneath the server name. You should see that Active Server Pages are Prohibited, this is the default configuration of IIS.
Simply set the extension to Allowed and the web server will start serving ASP pages. Repeat this for Server Side Includes too. This is required so that client pages parse the <include> variable in a page.
Last but not the least – you may probably want to shift your default web site as well as other web sites that you are going to host on the server off the System Partition (the one where the OS is installed). It’s always a good idea to shift the web site content to a different drive.
That’s it for the basic clean IIS 6.0 installation.

