Microsoft has developed forty Application Templates to provide out-of-the-box solutions to address the needs of specific business processes such as coordinating a Help Desk or tracking marketing campaigns. If you are reading this post, then I assume that you have downloaded all of the 40 Application Templates for SharePoint or at least one of them.
This Application Templates for Windows SharePoint Services 3.0 are separated into two groups, “Site Admin Templates” and “Server Admin Templates”.
Site Admin Templates are custom templates that have an *.stp extension and are easy for site administrators to install in a template gallery without requiring server administration access.
Server Admin Templates have a *.wsp extension and are created as site definitions, providing tighter integration and enhanced functionality within the Windows SharePoint Services platform. They require a server administrator to install.
Where they differ is how each type is structured and deployed on a SharePoint site. Site definitions consist of multiple files on a front-end Web server that are located within folders under the template directory. Custom templates are created through the user interface or through the object model and are stored in the database, providing a means for reusing customized lists and sites.
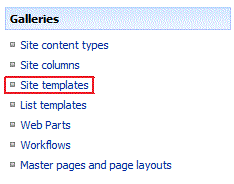
Note: Templates with the STP extensions can be uploaded directly in SharePoint’s ‘Site Templates’ page in Site Settings. Templates with WSP extensions must be added to the server side via stsadm command.
Here is how you should go about installing them on your SharePoint Site. For the rest of this post, we shall assume that you have already downloaded the necessary template files and you are the Administrator for the SharePoint Site and/or the server on which the site is running.
Installing STP Templates
This is very easy compared to the installation of WSP Templates. To install a *.stp template, perform the following steps:
- Login to your SharePoint Site after downloading the template package
- Select Site Settings from Site Actions
- Click Site Templates from Galleries

- Click Upload and browse for the template file which was downloaded

- Click OK once done
Installing WSP Templates
This is a bit complicated when compared to adding *.stp templates. Moreover, adding *.wsp templates also requires you to be the administrator of the SharePoint Site as well as the Administrator for the server.
- Login to the SharePoint server using Remote Desktop (RDP) or the console. Depends on how you are working – in front of the server or remotely
- Download the template package to the server
- To make things easier and to avoid typing the full path of the directory, I prefer to move the templates to C:/Program Files/Common Files/Microsoft Shared/Web Server Extensions/12/Bin folder including the ApplicationTemplateCore.wsp
- From the Start menu, select Run and open the Command Prompt by typing CMD or Command in the dialog box
- Go to the C:/Program Files/Common Files/Microsoft Shared/Web Server Extensions/12/Bin
Run the following command:
stsadm –o addsolution –filename ApplicationTemplateCore.wsp

- This will add the Application Template Core to the solutions management where it will need to be deployed. Since we had already moved the files to the BIN folder earlier, we can skip giving the full path to the ApplicationTemplateCore.wsp. If you ignored that, you can provide the full path by enclosing it in quotes.
- To deploy the Application Template Core, run the following command:
stsadm-o deploysolution –name ApplicationTemplateCore.wsp –allowgacdeployment –immediate
- After successfully deploying the Application Template Core, it is time to add the solution files. Type the following command:
stsadm -o addsolution -filename <template_name>.wsp

Note: replace the template_name.wsp with the actual template name.
- Next type the following command to deploy the solution:
stsadm -o deploysolution -name <template_name>.wsp –allowgacdeployment
Note: additional commands may need to be given, for example, – local if on a standalone machine and – immediate if installation being carried out in a SharePoint Farm
- To check deployment status by, click the Operations tab in the SharePoint Central Administration Site and then click Solution Management under Global Configuration
- After the solution is marked Globally deployed you may need to reset IIS. To do that quickly, open command prompt and type iisreset /noforce


2 comments
Hi Krian,
Yes, you can go ahead and create a website using SharePoint Services. As far as I’m aware about the licensing, you do not need a license for SharePoint Services as it is free for us and bundled with the Windows Server. But do check if you require an “Internet Connector” license if you are publishing your website to the Internet. If it is for internal use then I’m sure that no license is required.
Regards,
Vishal Vasu
Hello Mr. Vishal,
Thank for your this blog “Application Template instaling on WSS 3.0. Actually I didn’t know to how to install, but after reading this blog, I successfull installed.
Can You help me for my one query?
I installed Sharepoint service 3.0 on Win 2003 std R2, Any need to purchase Share point server license for this? can I work on share point service 3.0 only for create website by WSP templetes? Bcz. my company is very small?
Please reply