Welcome back to the third part of our comprehensive series on smartphone photography. Today, we’re diving deep into composition, lighting, and maximising your smartphone’s in-built camera features. So, buckle up and get ready to upgrade your skills and transform how you click photos with your handy device!
Mastering Composition
Our first call on this smartphone photography journey is mastering the art of composition. What’s composition, one may ask? Essentially, it’s how you capture the elements in your photo – think of it as the blueprint of your snapshot. We’ll dive deep into this concept, exploring effective strategies such as harnessing the rule of thirds, leading lines, and gridlines to add balance and flow to your photos.
Rule of Thirds and Gridlines
The composition is the backbone of a great photograph. One simplest yet most effective ways to improve your composition is using the rule of thirds. Imagine dividing your frame into a 3×3 grid. The goal is to place essential parts of your photo along those lines or at the points where they intersect. The rule of thirds is perhaps the most widely recognised in photography and one of the least demanding to learn and effectively utilise. To get it and use the rule of thirds, separate a picture into thirds evenly, as seen here. The four convergence points of these lines, and the four lines themselves, are where subjects, areas of strength for or lines of a photo, can be put to make significant areas of strength for a picture. Using this technique creates balance and allows the viewer’s eyes to interact with the picture more naturally. Most smartphones can display these gridlines – ensure you enable and utilise them.

The rule of thirds is a starting point. Like all rules in art, feel free to break them once you’ve understood them. Sometimes, a symmetrical composition or a perfectly centred subject can make a powerful image. Experiment and see what works best for each scene.
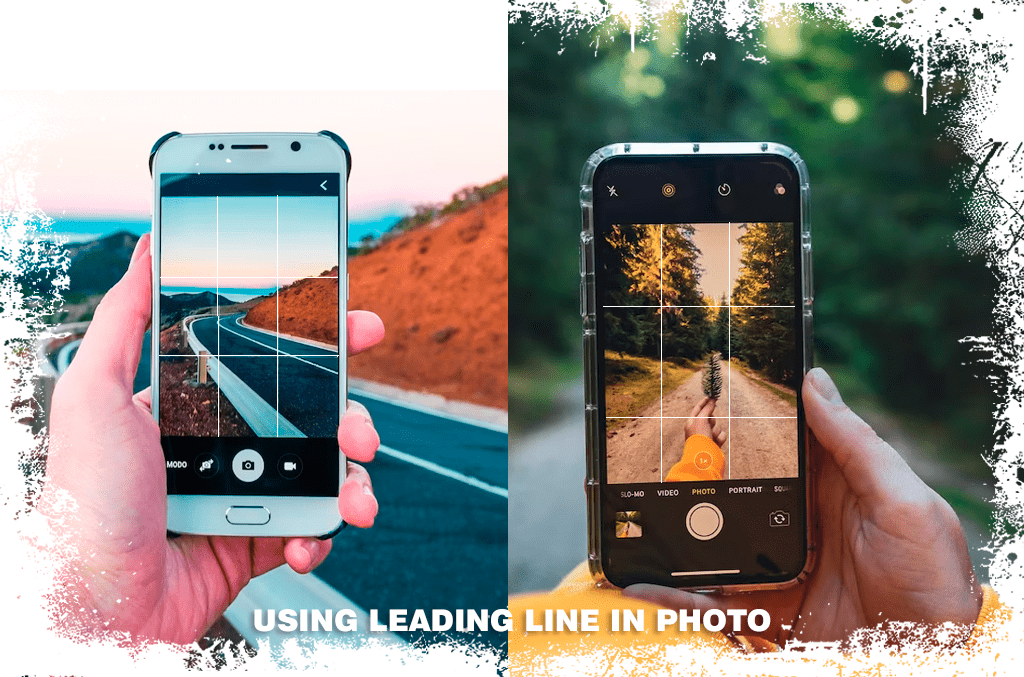
Leveraging Leading Lines
Leading lines are a fantastic way to guide your viewer’s eye through the image. They can be anything from a road to a river, a fence, or a shadow – anything that creates a line leading towards your subject. When you’re out shooting, actively look for these opportunities to enhance your composition.
Framing is another powerful technique in smartphone photography, and by using natural frames like windows, archways, or tree branches, you can isolate your main subject and add depth to the scene. Play with different perspectives to discover unique frames – you’d be surprised by what you can find.
Creating Visual Interest
A well-balanced image is pleasing to the eye. Placing your main subject off-centre and counterbalancing it with another object of lesser importance to fill the space can help achieve this.

Creating visual interest is crucial in smartphone photography. Including foreground elements can add depth, layers, and a sense of three-dimensionality. Experiment with different angles and perspectives to introduce exciting elements into your photographs.
Capture Abstracts
Another great way to create compelling images is to embrace abstract photography. Abstract photos often focus on form, colour, pattern, and texture. You can capture fascinating patterns in nature, architectural details, or even ordinary objects from a unique perspective, transforming them into intriguing works of art. Keep an eye out for repeating patterns and unusual textures.

Capture textures, patterns, shapes, or colours that intrigue you. It’s all about seeing the extraordinary in the ordinary and presenting it in a way that challenges the viewer’s perception.
Avoid Zooming In
While it may be tempting to zoom in to capture distant subjects, it’s best to avoid this as much as possible in smartphone photography. Digital zoom can degrade image quality and result in pixelated photos. Instead, try to get closer to the subject or crop the image later.
Optimising Lighting and Exposure
After we’ve mastered composition, we’ll switch gears to focus on the world of lighting and exposure – an area that can illuminate your images almost magically. Good lighting is often the difference between a flat, uninspiring photo and a shot that pops with vibrancy and depth. Let us uncover ways to maximise natural light and discuss strategies to avoid harsh and unflattering shadows.
Natural Light and Harsh Shadows
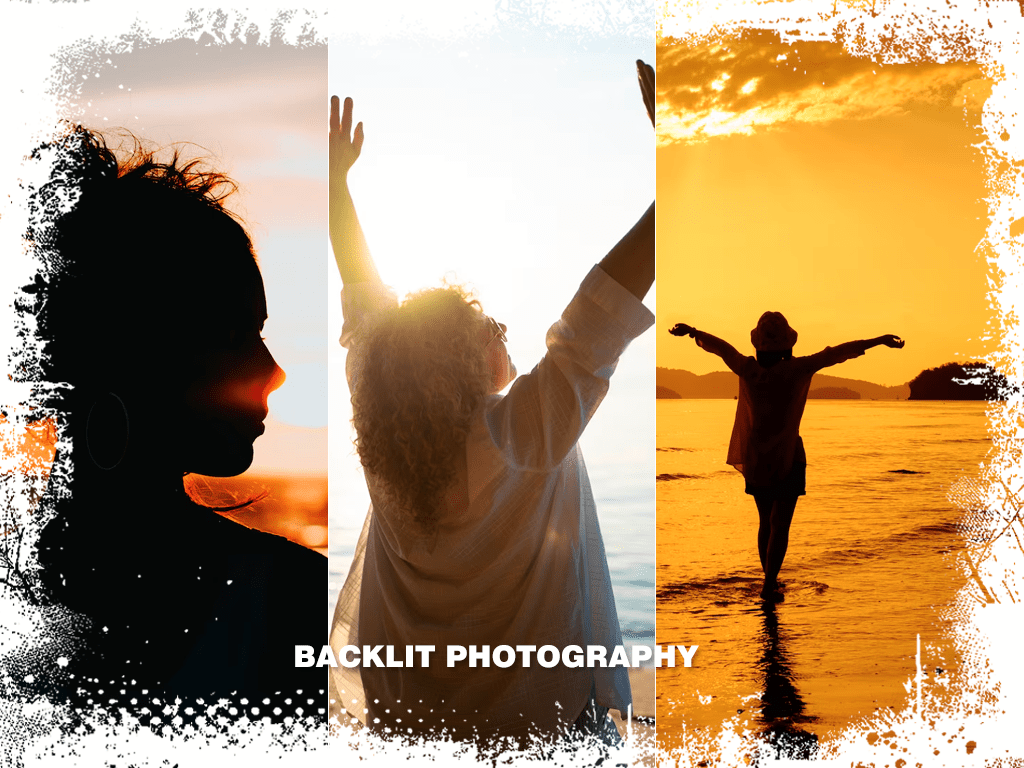
Lighting is one of the most critical aspects of any photograph. Understanding and manipulating natural light is one of the most effective ways to improve your smartphone photography drastically. Natural light, especially during golden hours (just after sunrise and before sunset), can give your photos a magical touch. Avoid shooting in the harsh midday sun, which can create unflattering shadows. One way to mitigate harsh shadows is by seeking shade under a tree, a building, or a sunshade. The shade provides a more uniform light, reducing contrast and harsh shadows.

Another tip for dealing with bright sunlight is to use it as backlighting. You can achieve a beautiful rim light effect by placing the subject between the sun and the camera. It can create dreamy photos with a soft glow around the subject. Just be mindful of tapping your subject on your phone’s screen to adjust the exposure correctly.
Remember, good lighting can make even the most mundane subject look extraordinary. So before you take your next photo, take a moment to consider the light.
HDR Mode and Exposure Compensation
HDR, or High Dynamic Range, is a powerful tool built into most smartphones today, and it can do wonders for your photography. The term “dynamic range” refers to the range of light levels in a photo, from the darkest shadows to the brightest highlights. In high-contrast scenes, like a sunset or a room with a window letting in bright light, a standard photo might leave the shadows too dark, or the highlights too blown out. Here’s where HDR comes in.
HDR takes several photos at different exposures in rapid succession – typically, one overexposed (too bright), one underexposed (too dark), and one correctly exposed. It then combines these images to create a single photo that ideally displays the best parts of each. The result is a photo that better captures the range of light and dark areas, much like the human eye sees it. For this reason, HDR can be especially useful in landscape photography, where the scene often has dark and light areas.

On the other hand, exposure compensation is another tool to enhance your smartphone photos. While your phone’s camera will automatically set an exposure level it deems correct, it can sometimes get it wrong, resulting in a picture that’s too bright or dark. Exposure compensation allows you to override the camera’s decision, enabling you to darken or brighten the image as needed.
Both HDR and exposure compensation offer powerful ways to capture better-exposed images. By understanding how and when to use these features, you can ensure your photos accurately represent the scene in front of you. Just remember, like any tool, these features can be helpful and harmful if not used correctly, so be sure to experiment and practice using them to get a feel for how they impact your images.
Manual Settings or Editing Apps
When it comes to overcoming low-light challenges in smartphone photography, having the ability to adjust your camera settings manually and knowing how to use photo editing apps can be an absolute game-changer.
Modern smartphones often provide a “Pro” or “Manual” mode, where you can adjust settings like ISO, shutter speed, and white balance. Manual mode gives you greater control over your photos, particularly in difficult lighting conditions. For instance, increasing the ISO can brighten an image in low light, but be mindful that high ISO levels can also introduce more noise or grain into the picture. On the other hand, slowing down the shutter speed allows more light to hit the sensor, brightening the image. But you’ll need to keep your phone steady, as slower shutter speeds can result in blurry photos if there’s any movement.

However, despite your best efforts in camera, sometimes a photo still doesn’t come out as expected. That’s where photo editing apps come in. These apps provide tools to tweak exposure, contrast, saturation, highlights, shadows, and more. In the case of low-light images, you can brighten shadows, reduce highlight clipping, and even reduce noise.
The bottom line is that manual settings and editing apps give you greater control over your final image’s appearance. They may require more effort and learning, but the improved results are worth it. So don’t be afraid to experiment with these settings and apps and see how they can enhance your smartphone photography.
Shoot in RAW
If you’re serious about smartphone photography, consider shooting in RAW format. Shooting in RAW format is a feature that many advanced smartphone cameras and some photography apps offer, and it can significantly enhance your editing capabilities.
Typically, when you take a photo, your smartphone processes the image data, adding its touch to aspects like exposure, colour balance, and contrast before compressing it into a JPEG file. While this is convenient, and the results can often look good straight out of the camera, this process also discards much of the original image data. When you go to edit the photo, you’re working with less information, which can limit how much you can adjust the photo without losing quality.
On the other hand, a RAW file is a digital negative – it saves all of the image data captured by the camera’s sensor without any processing or compression giving you much more flexibility when editing the photo. You can make more extensive adjustments to exposure, recover more detail from shadows and highlights, and adjust white balance with much greater accuracy, all without degrading the image quality.
Of course, RAW files are more extensive than JPEGs, and they do require post-processing before you can share them, so they might not always be the best choice for every situation. However, if you want to get the best possible quality from your smartphone photos and don’t mind doing extra editing work, shooting in RAW is the way to go.
Remember that to make the most of RAW images; you’ll need a good photo editing app. Apps like Adobe Lightroom Mobile, Adobe Photoshop Express, Snapseed, and VSCO all support editing RAW files and provide powerful editing tools to help you get the most out of your photos.
Exploring Different Shooting Modes
Almost every smartphone today offers a variety of shooting modes, allowing users to optimise their photography for specific scenes or effects. Understanding these modes and when to use them can significantly enhance your smartphone photography.
The most commonly used mode is the “Auto” mode, where the camera decides all the settings based on the scene it sees. While this mode works well for general photography, certain situations may require a more specialised approach.
For instance, the “Portrait” mode has become increasingly popular recently. This mode uses software to blur the background while keeping the subject focused, mimicking the shallow depth of field often seen in professional DSLR photos. It’s excellent for taking pictures of people or any other subject you want to stand out against a blurred background.
Another helpful mode is the “Panorama” mode, which lets you capture ultra-wide landscape photos. When you activate this mode and pan your phone across a scene, the camera automatically takes multiple photos and stitches them together to create one comprehensive image.
“Night” mode, or “Night Sight” as it’s sometimes called, is another tool that’s become common in many smartphones. This mode is designed for low-light situations and works by taking multiple photos at different exposures and blending them. The result is a brighter, clear photo with less noise than you could typically achieve in low light.
Finally, many smartphones also offer a “Macro” mode for close-up photography. Macro can capture intricate details of small subjects like insects, flowers, or jewellery.
These are just a few examples; your phone may offer even more modes. The key is experimenting with them and getting a feel for how and when to use each one. Doing so ensures you’re always using the best tool for the job and getting the best photos from your smartphone. And there you have it, friends – your comprehensive guide to mastering composition, optimising lighting, and maximising the built-in features of your smartphone for exceptional photography. We trust these insights will equip you to create compelling, visually arresting images with the device you carry every day. But don’t go away just yet; our smartphone photography journey is far from over. Stay tuned for the next instalment in our series, where we’ll delve even deeper into the world of mobile photography. We’ll explore post-processing techniques, dive into the universe of smartphone photography apps, and much more. So, keep practising these tips, experiment, have fun, and most importantly, keep shooting. The magic of smartphone photography is just beginning to unfold!
Cheers!
Other articles in this series: