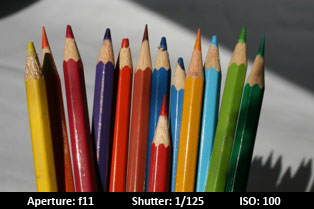
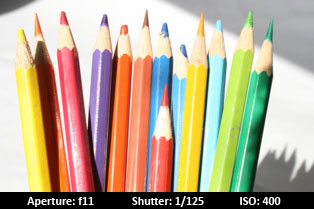
In the series of “Basics of Digital Photography“, today we discuss ISO.
ISO stands for International Standards Organisation and when related to photography, it is a industry scale for measuring the sensitivity to light. In today’s world where the film has been replaced by a digital image sensor, ISO basically relates to how much sensitive the sensor get’s to the light that enters the camera. ISO is measured in numbers where the lowest number means least sensitive to light (example ISO 100) while the highest being most sensitive to light (example ISO 3200). Almost all digital cameras today allow to control the ISO settings and so it is important to know what it is and what effect does it have on the snap that you take. After all, we all want to get that WOW factor in our photography – right?
I’ve seen many photographers – including myself – click photographs with the available natural light and avoid the use of flash. This is because the final image looks as natural as possible not to forget the softness it carries as the hard light is avoided. ISO plays an important role under these situations. Before clicking a photo, ask yourself the following:
- Is the subject well lit or is there enough ambient light?
- Is the subject stationary or moving?
- Should I use a tripod?
The above questions help to decide the ideal settings for ISO, Aperture and Shutter Speed. We are going to cover Aperture and Shutter Speed later but in context to ISO, the answers to th above three questions would help to decide the ISO value.
For example, if there is plenty of light, the subject is stationary and the camera is mounted on a tripod, a low ISO setting would be the best. We do not need the sensor to be highly sensitive to light as we can decrease the shutter speed so that more light enters the camera.
However, if it is dark, the subject is moving and a tripod is not available, a higher ISO is required. Reason, we need a high shutter speed to avoid blur or camera shake as the subject is moving and so we need the sensors to be more sensitive to light.
Below are some samples clicked at different ISO settings while keeping the same Aperture and Shutter Speed.


Let’s take an example. Assume that the ISO setting is at 100 and the light meter says that the camera should be set at f/4 and 1/60 second for a well exposed picture. But the subject is moving or our lens only opens to f/5.6.
In this case, 1/60 of a second will not stop the motion of a moving object and if the lens only opens to f/5.6 we are surely going to have an under exposed and blurry photograph. Now is the time to step up the ISO setting. If we step up to ISO-200 then we can move one of the other elements one full stop. Your setting would now be f/5.6 and 1/60 or f/4 and 1/125. Bust since the subject is on the move we’ll probably need more than one stop to freeze the motion so we will set our ISO to at least ISO-400. This will give us the ability of setting our aperture at f/4 and the shutter speed at 1/250.
So what is the trade off when using a high ISO? Noisier picture! Better quality pictures are achieved at a lower ISO. Higher ISO pictures capture lot of light and look grainy. Digital noise can be seen a sort of speckled effect in areas of similar colour, like skies or dark shadow areas.

Try keeping the ISO set to the lowest number and use aperture and shutter speed to get the right exposure. If the result is not good with aperture or shutter speed, move up to the next ISO setting and try again.


3 comments
hi vishal,i would want to learn photography and need to know a good tutor or classes i can take.
pl guide!
thanks!
samir sheth